Configuring Apache Fortress-OpenLDAP for High Availability
How to set up Apache Fortress-OpenLDAP to ensure high availability for your system, maximizing performance and minimizing downtime.

Updated at July 27th, 2024
Table of Contents
Date: 01-17-2022
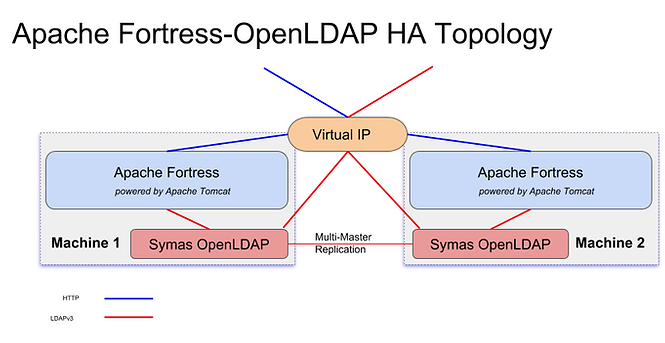
This document describes how Apache Fortress and OpenLDAP can be placed into a highly-available configuration. Apache Fortress provides Identity and Access Management APIs over HTTP using either JSON or REST formats. OpenLDAP is where the data is stored and maintained.
There are two identically configured machines, each with an instance of Fortress (Java) and OpenLDAP (native) processes running on it. A Virtual IP address will be used to route traffic to the designated primary node. In the event of a failure on the primary, the routing will be to the other.
What’s a Virtual IP Address
From Wikipedia, the free encyclopedia:
A virtual IP address (VIP or VIPA) is an IP address that doesn’t correspond to an actual physical network interface. Uses for VIPs include network address translation (especially, one-to-many NAT), fault-tolerance, and mobility.
Not Load-balanced
All traffic to either Fortress or OpenLDAP gets routed to a single machine. The virtual IP determines which of the two identically configured machines is active and which is standby.
In the event of failure on the primary node, the Virtual IP is then pointed to the secondary.
Advantages
- Simple to understand, automate/setup, maintain and use.
- Efficiency: No additional network hops (through a load-balancer) are required for round trips.
- Reliability: No risk of a ‘split-brain’ occurrence, when one node falls out of synch of the other, i.e. differing views on the data / inconsistent results.
- Safety: OpenLDAP running in multi-master replication mode will ensure both node’s data is kept in synch. Either node can function as the primary, at any time.
- Flexibility: Upgrade to a load-balanced configuration when needed.
- This configuration works with either Apache Fortress and/or OpenLDAP.
Section 1
Introduction
This document describes how to setup a VIP (Virtual IP Address) over 2 servers (fortress1 and fortress2). The concepts should work on any platform but were tailored for Redhat7+.
Here, the two servers can be seen from the clients as one single server, with one single IP address. However, only one server will be reachable, until the VIP switches from one server to the other. Here is a picture showing the logical view, with the VIP pointing to fortress1 or fortress2 and a fictional set of IP numbers.
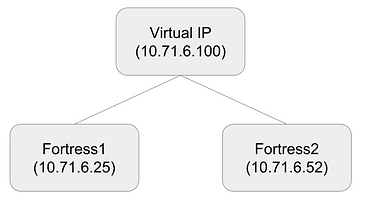
In any case, server names aren’t all that relevant when it comes to configuring a VIP.
Getting network information
We first need to list the existing network devices on each node. This is done using the ifconfig command:
[myuser@FORTRESS1 ~]$ ifconfig
ens160: flags=4163 mtu 1500
inet 10.71.6.25 netmask 255.255.255.0 broadcast 10.71.6.255
inet6 fe80::20c:29ff:feb0:e2f6 prefixlen 64 scopeid 0x20
ether 00:0c:29:b0:e2:f6 txqueuelen 1000 (Ethernet)

lo: flags=73 mtu 65536
inet 127.0.0.1 netmask 255.0.0.0
inet6 ::1 prefixlen 128 scopeid 0x10
loop txqueuelen 0 (Local Loopback)
Do the same on the other machine.
Creating a new virtual IP
This command creates a new IP associated with the existing one. This will not survive a reboot or network restart.
[myuser@FORTRESS1 ~]$ sudo ifconfig ens160:0 10.71.6.100
[myuser@FORTRESS1 ~]$ ifconfig
ens160: flags=4163 mtu 1500
inet 10.71.6.25 netmask 255.255.255.0 broadcast 10.71.6.255
inet6 fe80::20c:29ff:feb0:e2f6 prefixlen 64 scopeid 0x20
ether 00:0c:29:b0:e2:f6 txqueuelen 1000 (Ethernet)

ens160:0: flags=4163 mtu 1500
inet 10.71.6.100 netmask 255.0.0.0 broadcast 10.255.255.255
ether 00:0c:29:b0:e2:f6 txqueuelen 1000 (Ethernet)

lo: flags=73 mtu 65536
inet 127.0.0.1 netmask 255.0.0.0
inet6 ::1 prefixlen 128 scopeid 0x10
loop txqueuelen 0 (Local Loopback)
Do the same on the other machine.
Creating a new permanent virtual IP
If we want this VIP to be up when the server is started, we need to create a network script for it.
Assuming the physical network device is ens160, and its associated network script is /etc/sysconfig/network-scripts/ifcfg-ens160, we need to copy this file and give it a new name ending with :0
[myuser@FORTRESS1 ~]$ sudo cp /etc/sysconfig/network-scripts/ifcfg-ens160
/etc/sysconfig/network-scripts/ifcfg-ens160:0
[myuser@FORTRESS1 ~]$ sudo chmod 644 /etc/sysconfig/network-scripts/ifcfg-ens160:0
Now change the DEVICE and IPADDR values:
[myuser@FORTRESS1 ~]$ sudo vi /etc/sysconfig/network-scripts/ifcfg-ens160:0

DEVICE=ens160:0
BOOTPROTO=none
HWADDR=
ONBOOT=yes
TYPE=Ethernet
NETMASK=255.255.255.0
IPADDR=10.71.6.100
GATEWAY=10.71.6.1
Finally, restart the network :
[myuser@FORTRESS1 ~]$ sudo service network restart
Restarting network (via systemctl): [ OK ]
We can check that the VIP is up and running :
[myuser@FORTRESS1 ]$ ifconfig
ens160: flags=4163 mtu 1500
inet 10.71.6.25 netmask 255.255.255.0 broadcast 10.71.6.255
inet6 fe80::20c:29ff:feb0:e2f6 prefixlen 64 scopeid 0x20
ether 00:0c:29:b0:e2:f6 txqueuelen 1000 (Ethernet)

ens160:0: flags=4163 mtu 1500
inet 10.71.6.100 netmask 255.255.255.0 broadcast 10.71.6.255
ether 00:0c:29:b0:e2:f6 txqueuelen 1000 (Ethernet)

lo: flags=73 mtu 65536
        inet 127.0.0.1 netmask 255.0.0.0
inet6 ::1 prefixlen 128 scopeid 0x10
loop txqueuelen 0 (Local Loopback)
Do the same on the other server.
NOTE: Two servers can’t have the same IP address at the same time, which means the VIP will always be associated to only one server.
Activate/De-activate a server
If we want to change the server that is seen as the VIP, we just have to shut down the active server’s interface and activate the new server’s interface:
[myuser@FORTRESS1 ]$ sudo ifconfig ens160:0 downand on the other server:
[myuser@FORTRESS2 ]$ sudo service network restartSection 2
Prereqs ( *tailored for REDHAT)
- Apache Fortress-OpenLDAP Virtual IP Setup complete
- Two time-synched machines.
- 1 Core, 1 GB RAM, 20 GB HD (minimum)
- root access (or a dedicated user with sudo access)
- Recent version of OpenLDAP client and server installed
- Installed rsyslog
Introduction
This document describes the preparation of two OpenLDAP server instances, each running on separate machines, into a multi-master configuration, suited for Apache Fortress.
Directory Information Tree (DIT) Layout
A DIT’s a hierarchical structure that organizes its data under separate categories. If new to LDAP, it helps to think of a DIT as volume of files on a typical computer system. Each of the ou’s under the suffix represent a category of data, sort of like folders in our typical machine’s file manager. The data nodes themselves reside below their parents, and are stored using keys like uid and cn (depending on the type). This DIT recommendation supports Apache Fortress requirements and its data replicates between both masters.

OpenLDAP Server Setup
To be performed on each machine…
1. Download and extract the configuration package – fortress-openldap-ha-config-v3
It contains three files referenced below:
- slapd.conf - OpenLDAP’s configuration file
- bootstrap.ldif - Seeds the OpenLDAP directory structure and data.
- fortress.schema - Contains object definitions to store RBAC policies in OpenLDAP.
Run these steps as root.
Server 1 Setup
2. Navigate to the config folder and copy these files from the config package:
$ cp fortress.schema $OPENLDAP_HOME/etc/openldap/schema
$ cp slapd.conf $OPENLDAP_HOME/etc/openldap
Where OPENLDAP_HOME matches the machine’s installation location, e.g.
/opt/symas3. Edit the slapd.conf file and make the following modifications:
$ vi /opt/symas/etc/openldap/slapd.confa. Set serverid on the first line, which must be unique across all the servers.
# Server Number 1
serverid 1
b. In each subsection of syncrepl, modify “servernameXX” to your server name (hostname or IP address can be used)
provider=ldap://servername01
provider=ldap://servername02c. Verify the credentials passwords in each section of the syncrepl section.
credentials=myslapdserverpwd. Verify the rootpw in the default database section AND in the log database section.
rootpw myrootpwSave the slapd.conf file.
4. Create two folders:
 $ mkdir $DB_HOME/openldap-data/dflt
 $ mkdir $DB_HOME/openldap-data/accesslog
Where DB_HOME matches local machine’s OpenLDAP data home. This is specified in the slapd configuration. For example, default DB:
#---------------------------------------------------------------------
# Default LMDB database definitions
database         mdb

...

directory "/var/symas/openldap-data/dflt"
and, accesslog DB:
#---------------------------------------------------------------------
# AccessLog database
#---------------------------------------------------------------------
database mdb
...
directory /var/symas/openldap-data/accesslog
5. Test the configuration:
$ slaptest -f $OPENLDAP_HOME/etc/openldap/slapd.conf -u6. Import data using the supplied .ldif file.
a. Test the import with -u option:
$ slapadd -v -u -c -f $OPENLDAP_HOME/etc/openldap/slapd.conf -l bootstrap.ldif b. Perform the import:
$ slapadd -v -c -f $OPENLDAP_HOME/etc/openldap/slapd.conf -l bootstrap.ldif7. Create user for the slapd process.
$ adduser openldap8. Create the slapd log file, then change owner from root to the new openldap user on slapd’s files.
$ touch /var/log/openldap.log
$ chown openldap.openldap -R $OPENLDAP_HOME /var/log/openldap.log DB_HOME
9. Configure the slapd logger under rsyslog.
a. Edit rsyslog conf file:
$ vi /etc/rsyslog.confb. Add the following to the file
local4.* /var/log/openldap.logc. Restart the rsyslog daemon
$ service rsyslog restart10. Start the server under the openldap user.
Server 2 Specific Instructions
1. Extract the data from Server 1.
$ slapcat -b "dc=example,dc=com" -f $OPENLDAP_HOME/etc/openldap/
slapd.conf -l output.ldif
2. Copy the Server 1 slapd.conf and output.ldif files over to Server 2.
3. Make the following modifications to Server 2’s slap.conf:
a. Set serverid on the first line, which must be unique across all the servers.
# Replica Server
serverid 2
Everything else should remain the same in the slapd.conf file on the second server.
4. Run the steps under OpenLDAP Server Setup again, on second machine. Be sure to use the extracted ldif, output.ldif, in place of the bootstrap.ldif on the import step.
Verify
1. slapd process is running as openldap user.
ps -ef | grep slapd2. Tail the log:
tail -f -n10000 /var/log/openldap.log3. Connect and browse with Apache Directory Studio (https://directory.apache.org/studio/).
4. Add test data, verify it replicates.
5. Examine the Context CSN node on LDAP server #1.
ldapsearch -x -LLL -H ldap://fortress1 -D "cn=Manager,dc=example,dc=com" -w
secret -s base -b 'dc=example,dc=com' contextCSN dn: dc=example,dc=com
dn: dc=example,dc=com
contextCSN: 20181123194724.769203Z#000000#001#000000
contextCSN: 20181123194743.991925Z#000000#002#000000
Where fortress1 is hostname or IP address of first instance.
6. Example on LDAP server #2.
ldapsearch -x -LLL -H ldap://fortress2 -D "cn=Manager,dc=example,dc=com" -w
secret -s base -b 'dc=example,dc=com' contextCSN dn: dc=example,dc=com
dn: dc=example,dc=com
contextCSN: 20181123194724.769203Z#000000#001#000000
contextCSN: 20181123194743.991925Z#000000#002#000000
Where fortress2 is hostname or IP address of second instance.
7. Compare the two.
Section 3
Prereqs *tailored for REDHAT
- Java v8 installed
- Apache Fortress-OpenLDAP Virtual IP Setup complete
- Steps under OpenLDAP HA Installation complete
Introduction
Apache Fortress software will be installed to:
- /opt/fortress: The root folder for the Apache Fortress runtime.
- /opt/fortress/lib: Apache Fortress Realm proxy component.
- /opt/fortress/webapps: Apache Fortress Rest component.
- /opt/fortress/logs/catalina.out: The process logfile.
- /etc/systemd/system/fortress.service: The service configuration is placed here.
Fortress Server Setup
To be performed on each machine.
1. Prep Environment
a. Download Tomcat 9 to local machine
b. Create Installation folder, extract tar, goto folder:
$ mkdir /opt/fortress
$ tar -zxvf apache-tomcat-**[VERSION]**.tar.gz -C /opt/fortress --strip-components=1
$ cd /opt/fortress
Where [VERSION] matches downloaded latest Apache Fortress Tomcat (as of this document, 9.0.13.)
2. Install Fortress
Deploy Apache Fortress Realm Proxy:
$ wget
http://repo.maven.apache.org/maven2/org/apache/directory/fortress/fortres
s-realm-proxy/**[VERSION]**/fortress-realm-proxy-**[VERSION]**.jar
-P
/opt/fortress/lib
Where [VERSION] matches latest Apache Fortress Realm. As of today,
2.0.3.
a. Deploy Apache Fortress Rest:
$ wget
https://repository.apache.org/content/repositories/releases/org/apache/di
rectory/fortress/fortress-rest/**[VERSION]**/fortress-rest-**[VERSION]**.war
-P
/opt/fortress/lib
Where [VERSION] matches latest Apache Fortress Rest (as of this document, 2.0.3.)
3. Configure Fortress-as-a-Service
a. Create a group and user for Apache Fortress process to run under:
$ groupadd fortress
$ useradd -s /bin/nologin -g fortress -d /opt/fortress fortress
b. Edit systemd file
$ vi /etc/systemd/system/fortress.servicec. Add the following. Change JAVA_OPTS for hostname, admin user/pw for your env.
[Unit]
Description=Apache Fortress is powered by Apache Tomcat
After=syslog.target network.target
[Service]
Type=forking
Environment=JAVA_HOME=/usr/lib/jvm/jre
Environment=CATALINA_PID=/opt/fortress/temp/fortress.pid
Environment=CATALINA_HOME=/opt/fortress
Environment=CATALINA_BASE=/opt/fortress
Environment='CATALINA_OPTS=-Xms512M -Xmx1024M -server -XX:+UseParallelGC'
Environment="JAVA_OPTS=-Djava.awt.headless=true
        -Dfortress.host=**localhost**
        -Dfortress.port=**389**
        -Dfortress.admin.user=**cn=manager,dc=example,dc=com**
        -Dfortress.admin.pw=**secret**
        -Dfortress.config.root=**ou=config,dc=example,dc=com**"
        -Dfortress.min.admin.conn=1
        -Dfortress.max.admin.conn=10
        -Dfortress.ldap.server.type=openldap
        -Dfortress.config.realm=DEFAULT
ExecStart=/opt/fortress/bin/startup.sh
ExecStop=/bin/kill -15 $MAINPID
User=fortress
Group=fortress
[Install]
WantedBy=multi-user.target- Point each instance of Apache Fortress to slapd running on localhost.
- Defaults given for JAVA_HOME, service accounts, password, host, port, etc. Change to match your environment.
d. Enable the service to startup automatically.
$ chown fortress.fortress -R /opt/fortress
$ systemctl start fortress.service
$ systemctl enable fortress.service
e. Verify tomcat is running and no errors in the logs.
$ ps -ef | grep tomcat
$ tail -f -n10000 /opt/fortress/logs/catalina.out
Use Apache Fortress Quickstart to test services
Prequisites for these tests
- Curl installed onto local machine
1. Download and extract.
$ wget https://github.com/shawnmckinney/apache-fortress-quickstart/archive/master.zip2. Open a system prompt and navigate to folder in quickstart package containing test files.
$ cd apache-fortress-quickstart-master/src/test/resources 3. Run through the samples: SECTION 5. Test Apache Fortress Rest with Curl.
a. Run the sample curl commands. Password for tests, corresponding with adminuser $3cret
b. Point the commands to IP address of the VIP, setup earlier.
4. Verify replication
Use a preferred LDAP client to verify that data is being replicated between the masters as you run the tests.